

How to Update Your React Native App Live with CodePush (Quick Manual)
Discover a faster and more efficient way to update your react native app: Implementing CodePush in a React Native project will allow you to push these updates directly to your live app. Here’s a quick guide to show you how to do it, step by step.


Publishing mobile apps to the stores is not an easy task. There are a lot of things to consider, such as 2 different ecosystems, each with different processes. This whole process has to be repeated each time a new feature is released or a batch of issue fixes are ready, which can be a tedious habit. In this article, we’ll show you how to update your react native app with CodePush, guiding you through the implementation of CodePush in a React Native project, as a faster and more efficient way to push these updates directly to your live app.
Written by: Javier de los Reyes, Mobile developer at Nuvolar.
CodePush: The best tool to push updates directly to your users
CodePush is a cloud service managed by Microsoft, within the AppCenter, that allows developers to deploy updates to end users’ devices.
It acts as a repository that teams can publish updates to (changes to JS files, for example), and has a client SDK for different technologies to allow querying for those updates.
Thanks to the JS nature of React Native, the bundle generated by Metro (composed of JS files and assets) can be used as a way to synchronize those files between the application and the AppCenter server.
As such, changes in files on the native side, such as MainActivity.java or AppDelegate.m can’t be updated and served this way, and thus require a full rebuild and distribution of the binary.
Setting up AppCenter’s CodePush in 5 minutes
For this example, and to play around with this tool a little bit, you don’t exactly need an application to be fully distributed across the stores; just a standalone release build will be enough.
That means you have to be able to run your app unattached from the React Native CLI and Metro typical execution, to prevent the update code from being synchronized with the launched application at runtime.
We will see more about this later on.
Once you have an account created in AppCenter, we can click on the Add new button and select the Add new app option there, so the form below will appear:
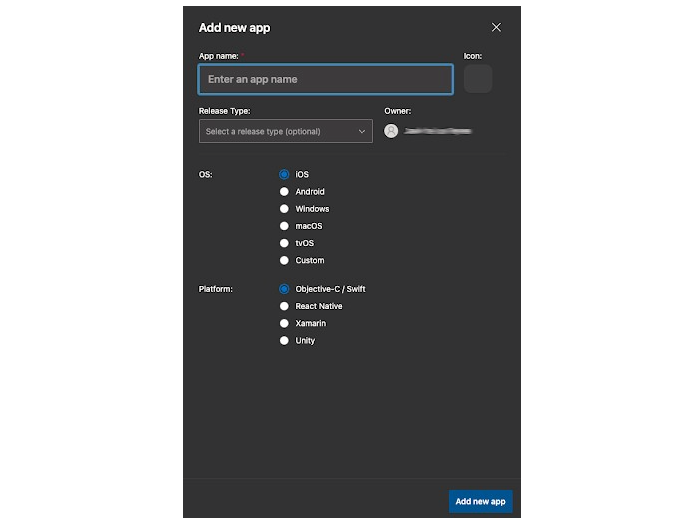
We have to create a separate app for each platform. In our case, it will be as follows:
1. React Native iOS app:
a. Release Type → Beta
b. OS → iOS
c. Platform → React Native
2. React Native Android app:
a. Release Type → Beta
b. OS → Android
c. Platform → React Native
You’ll then have something like this:

Now let’s navigate to one of those two apps, and on the left panel that appears, click on the Distribute option and then on the CodePush element displayed under that category.
You’ll see a screen warning that you don’t have any deployments, so let’s create them.
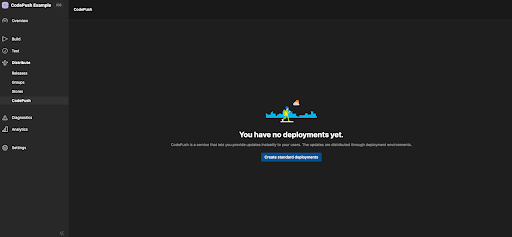
Press on the Create standard deployments button to let the magic happen!
After that, two environments will be available for you in the top right corner. In this case, I will be working with the Staging one.
If you click on the tool on the right, you’ll see a dialog containing one key for each environment. Make sure to have the Staging key at hand (one for iOS and the other for Android) for the React Native configuration later.
Update Your React Native App with CodePush
Now that we have the service configuration ready, it’s time to prepare our React Native project to deploy updates via CodePush.
Let’s assume you already created a React Native project using its CLI, you can check the React Native official docs to guide you through.
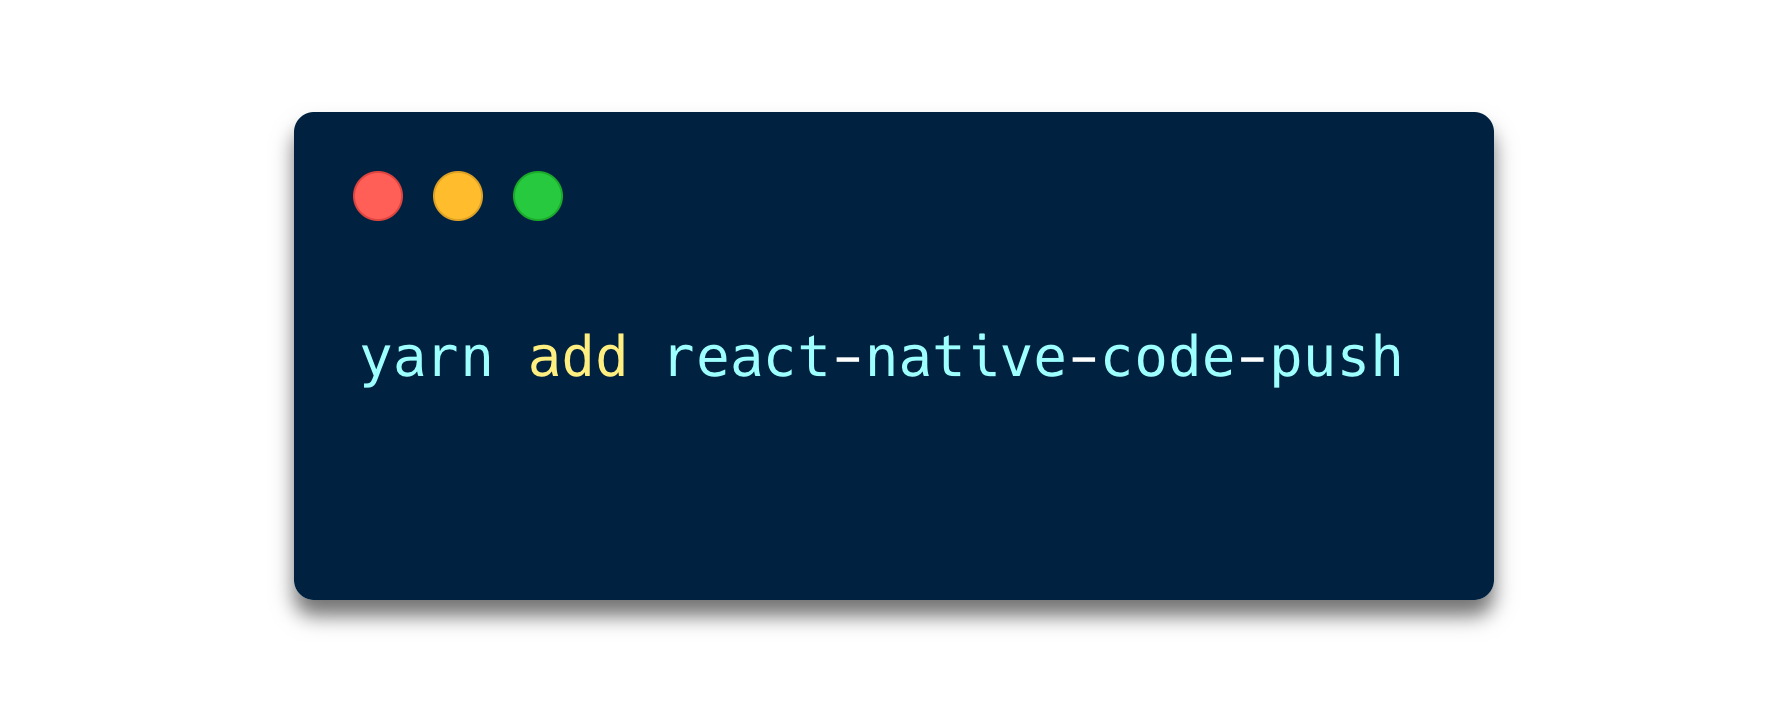
First, let’s add the dependency to the project:
NOTE: I will be using yarn during this example, but npm can also be used.
With the library installed, let’s set up CodePush for each platform.
iOS Configuration
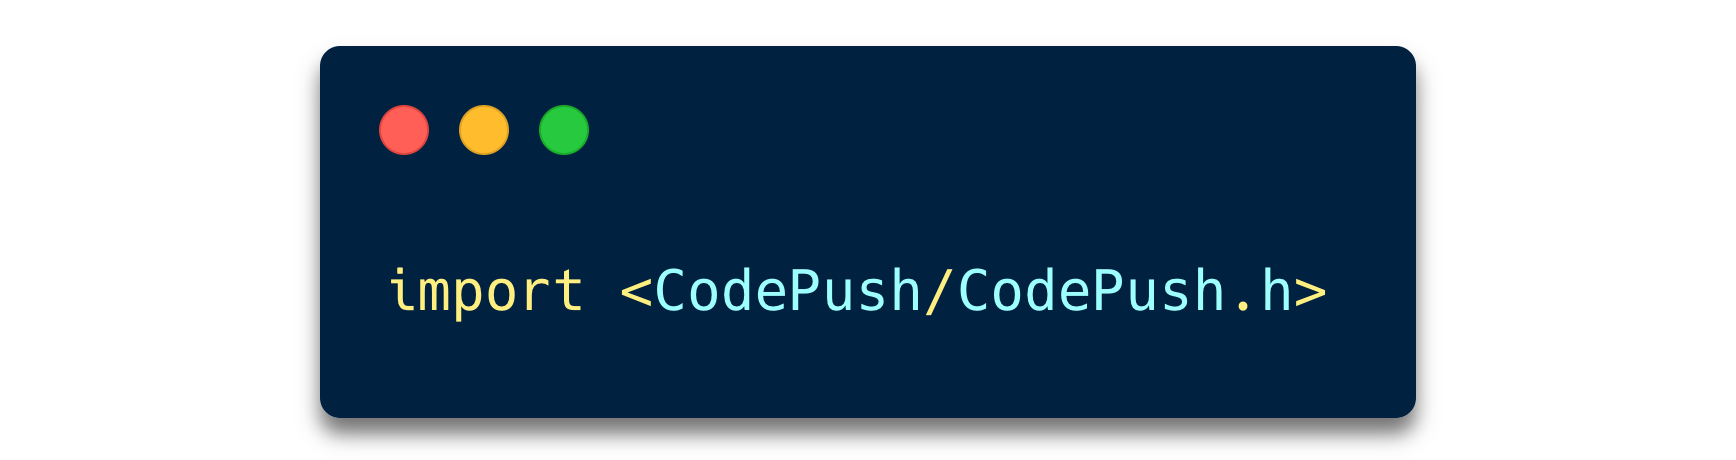
Navigate to your AppDelegate.m file and add the CodePush dependency at the top of the file:
NOTE: It’s important to add it before the #ifdef FB_SONARKIT_ENABLED sentence, some people have reported errors otherwise.
After that, go to the bottom of the file and replace this line:
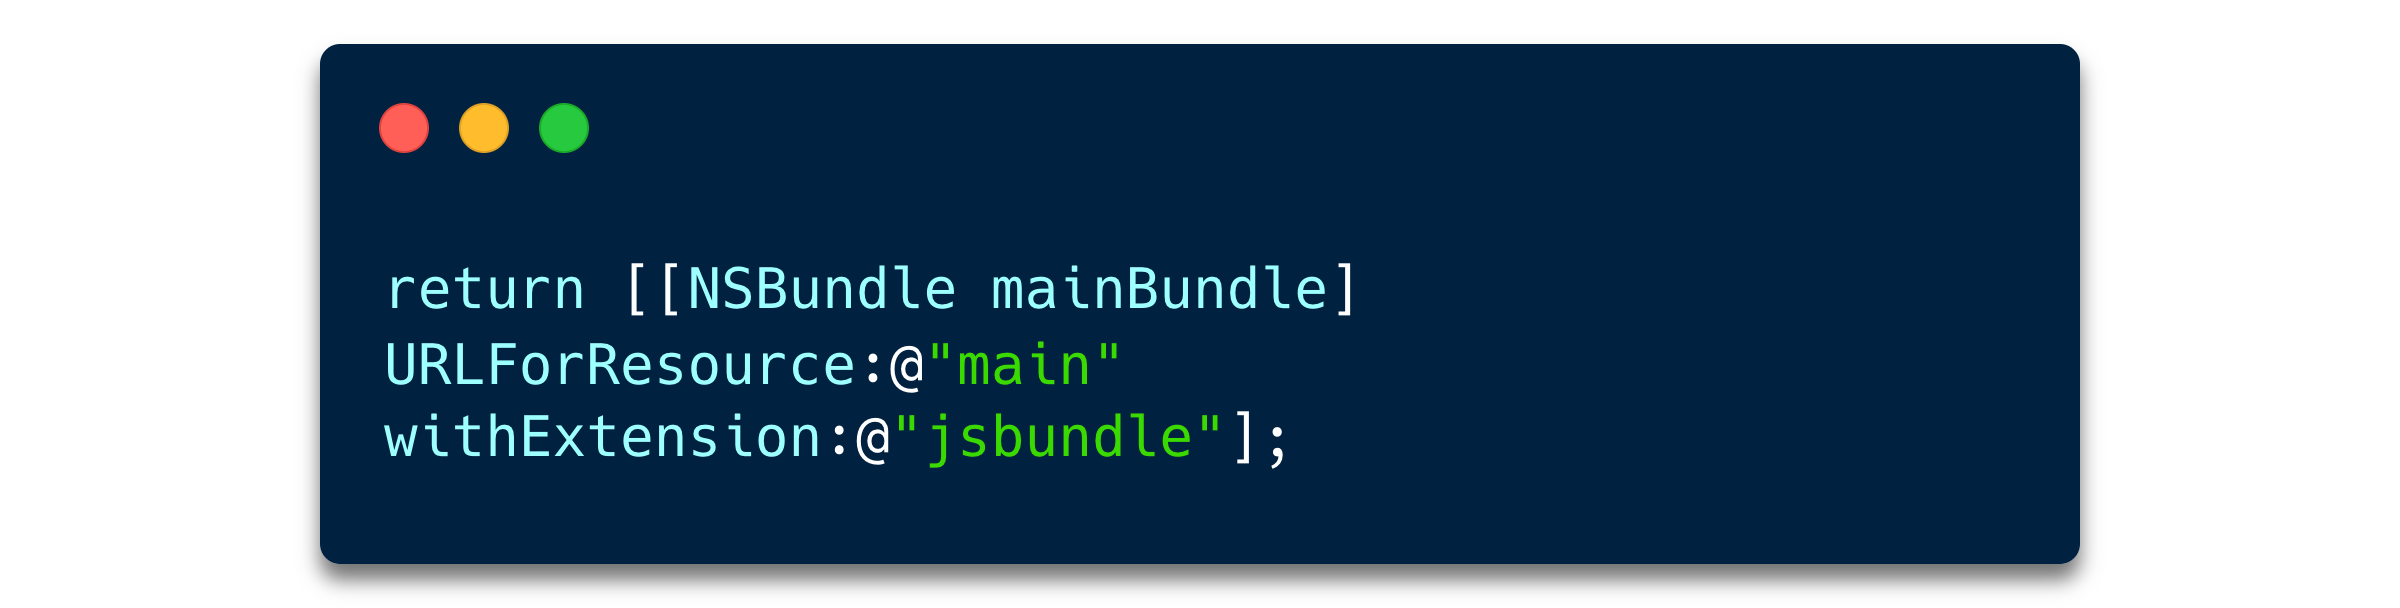
For the one below:

This change configures the app to always use the most recent version of your JS bundle.
At the first launch, it will correspond to the compiled bundle that the app shipped with, but after we push some updates to CodePush, this will tell the app to use the newly generated bundle that contains those updates.
Then we can proceed and install the pods inside the /ios folder.
And last but not least, we need to add the CodePush key to the Info.plist file. The addition should look like this:
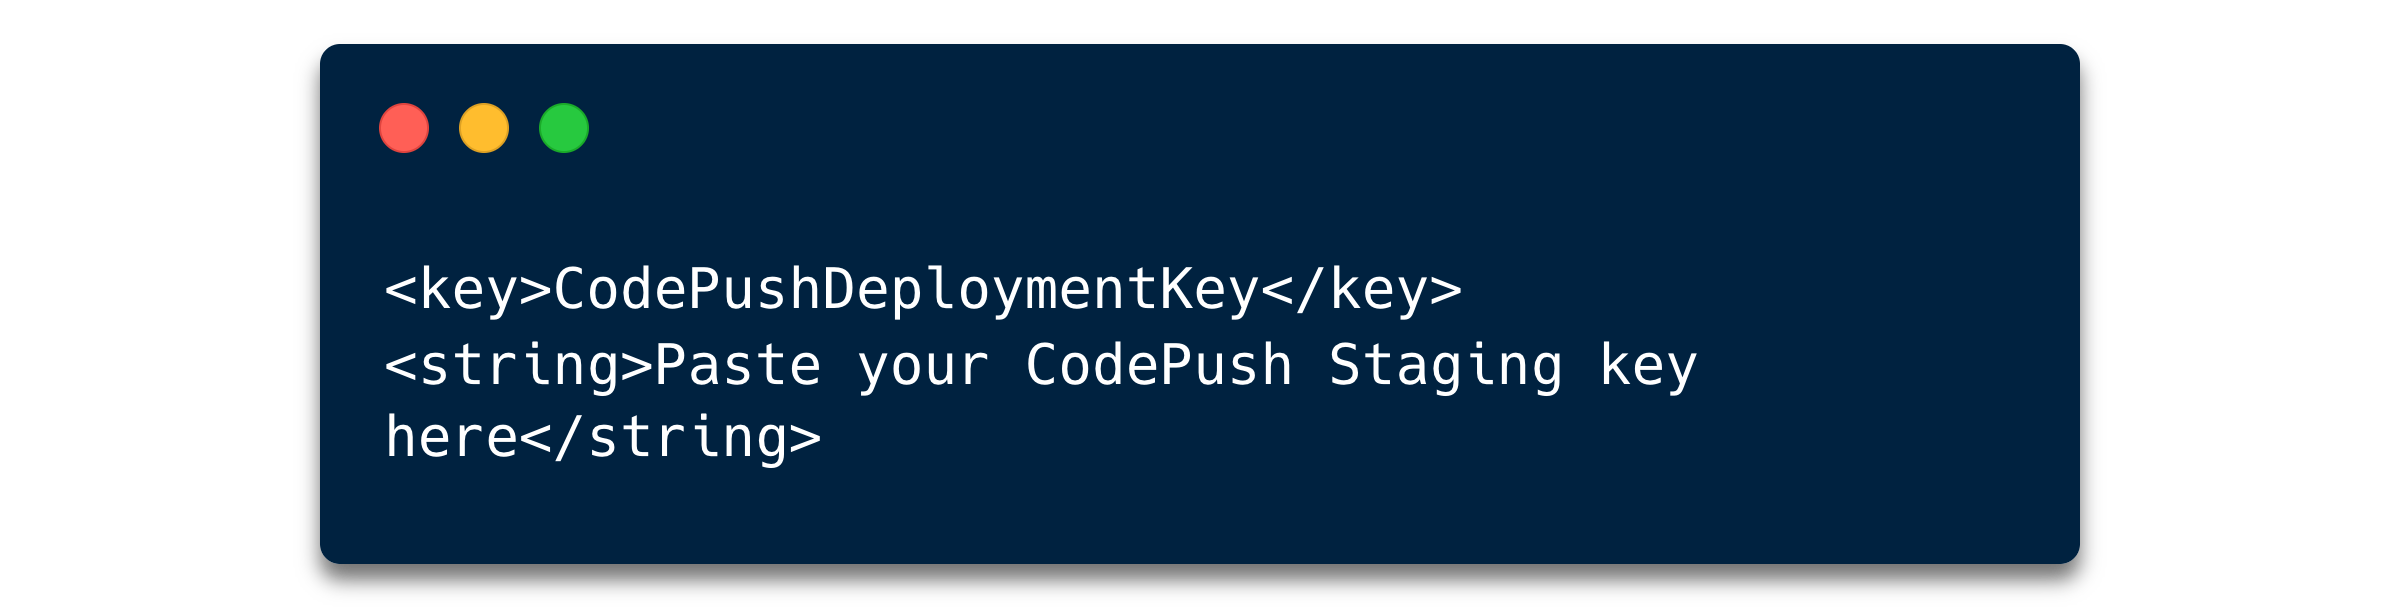
In this example we are just using the Staging environment, you can refer to Microsoft docs for multi-deployment testing if you need multiple environments for your application.
The configuration for iOS is now ready!
The next step would be releasing a detached standalone version of your app, and you can do so via Xcode. Note that you will need an Apple Developer Account to generate this build.
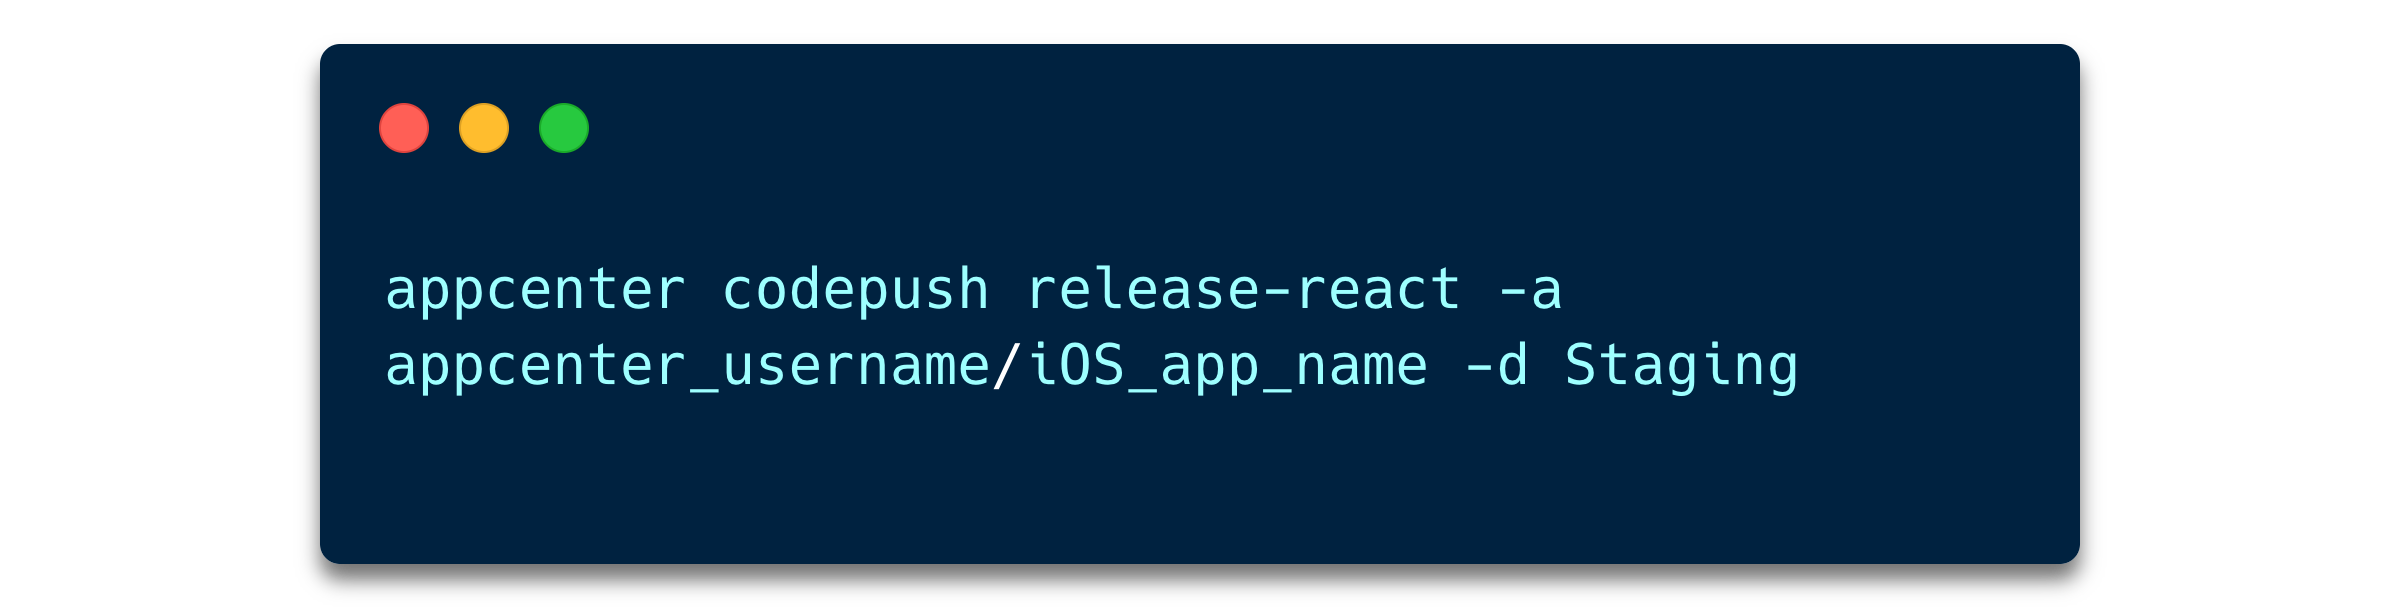
Once we have a release built up and running on a device, we can trigger the first iOS CodePush deploy if you want to have the same build on AppCenter previous to the first batch of updates.
If not, proceed to make any changes to your project and execute the following command in the terminal:
If everything went ok, you will be able to see a table like this:
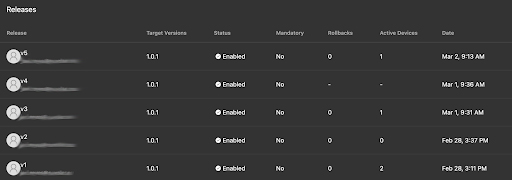
Now, whenever we close the application and start it again, the content from the last CodePush bundle will be available.
Let’s continue with the Android setup!
Android Configuration
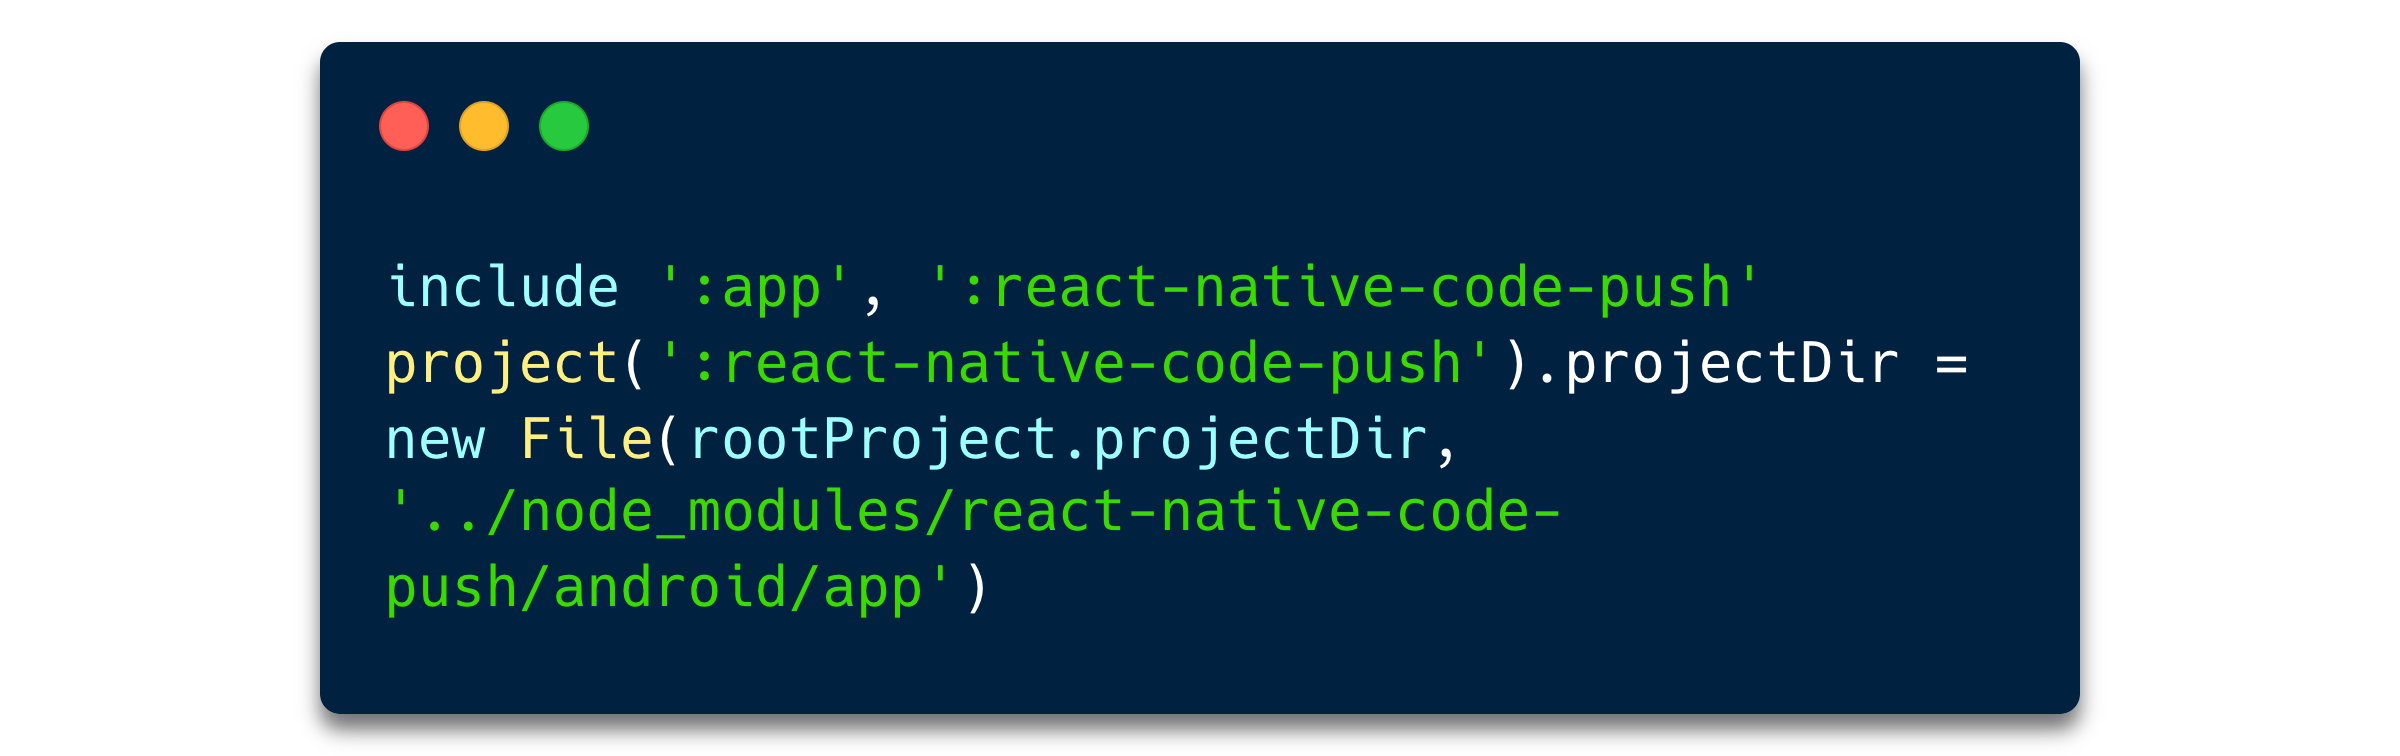
First, let’s navigate to the android/settings.gradle file and add the following:
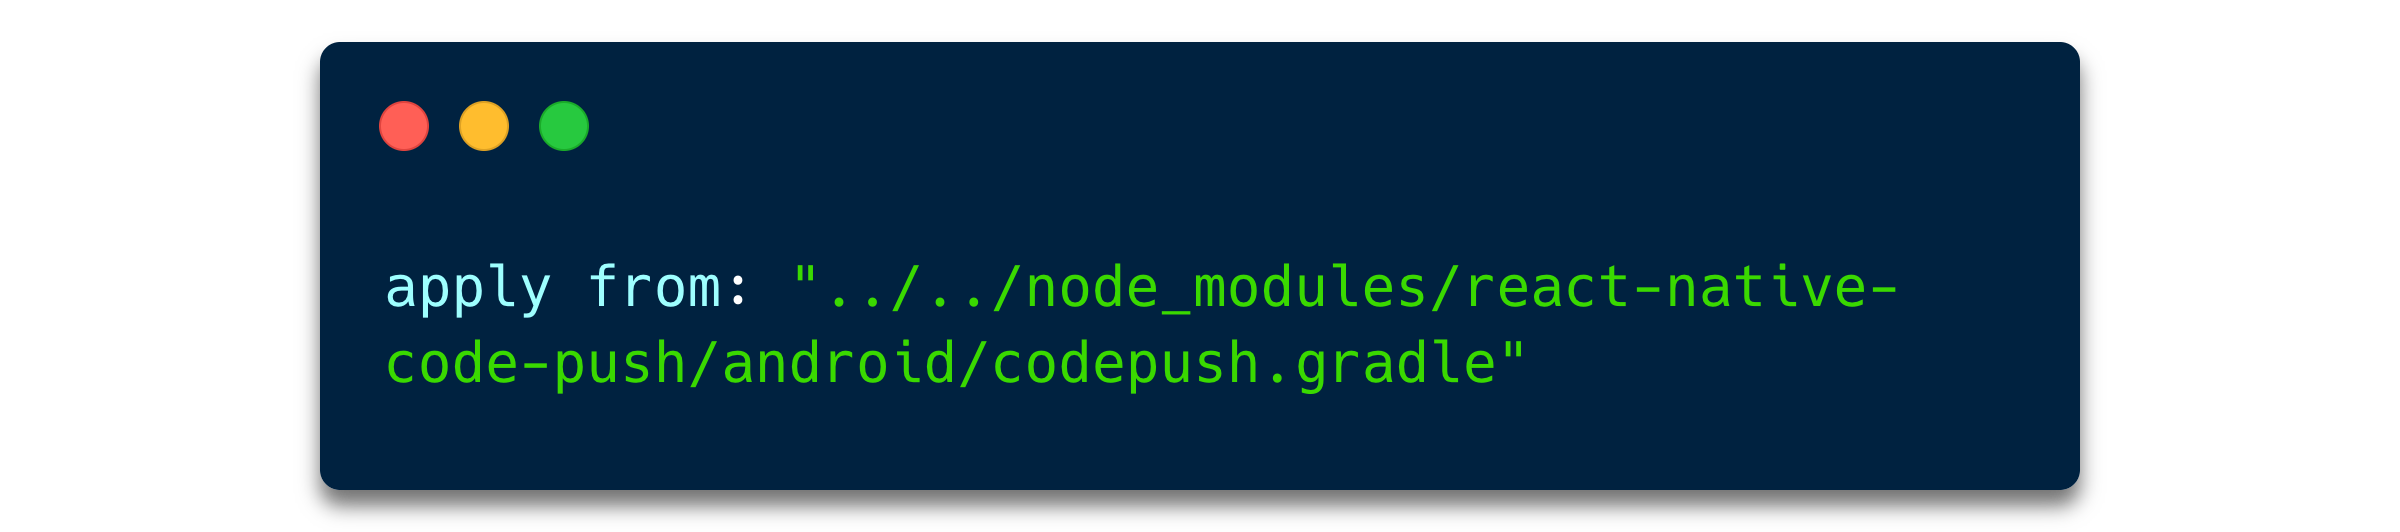
Then, in the android/app/build.gradle, add the line below, just underneath the react.gradle one:
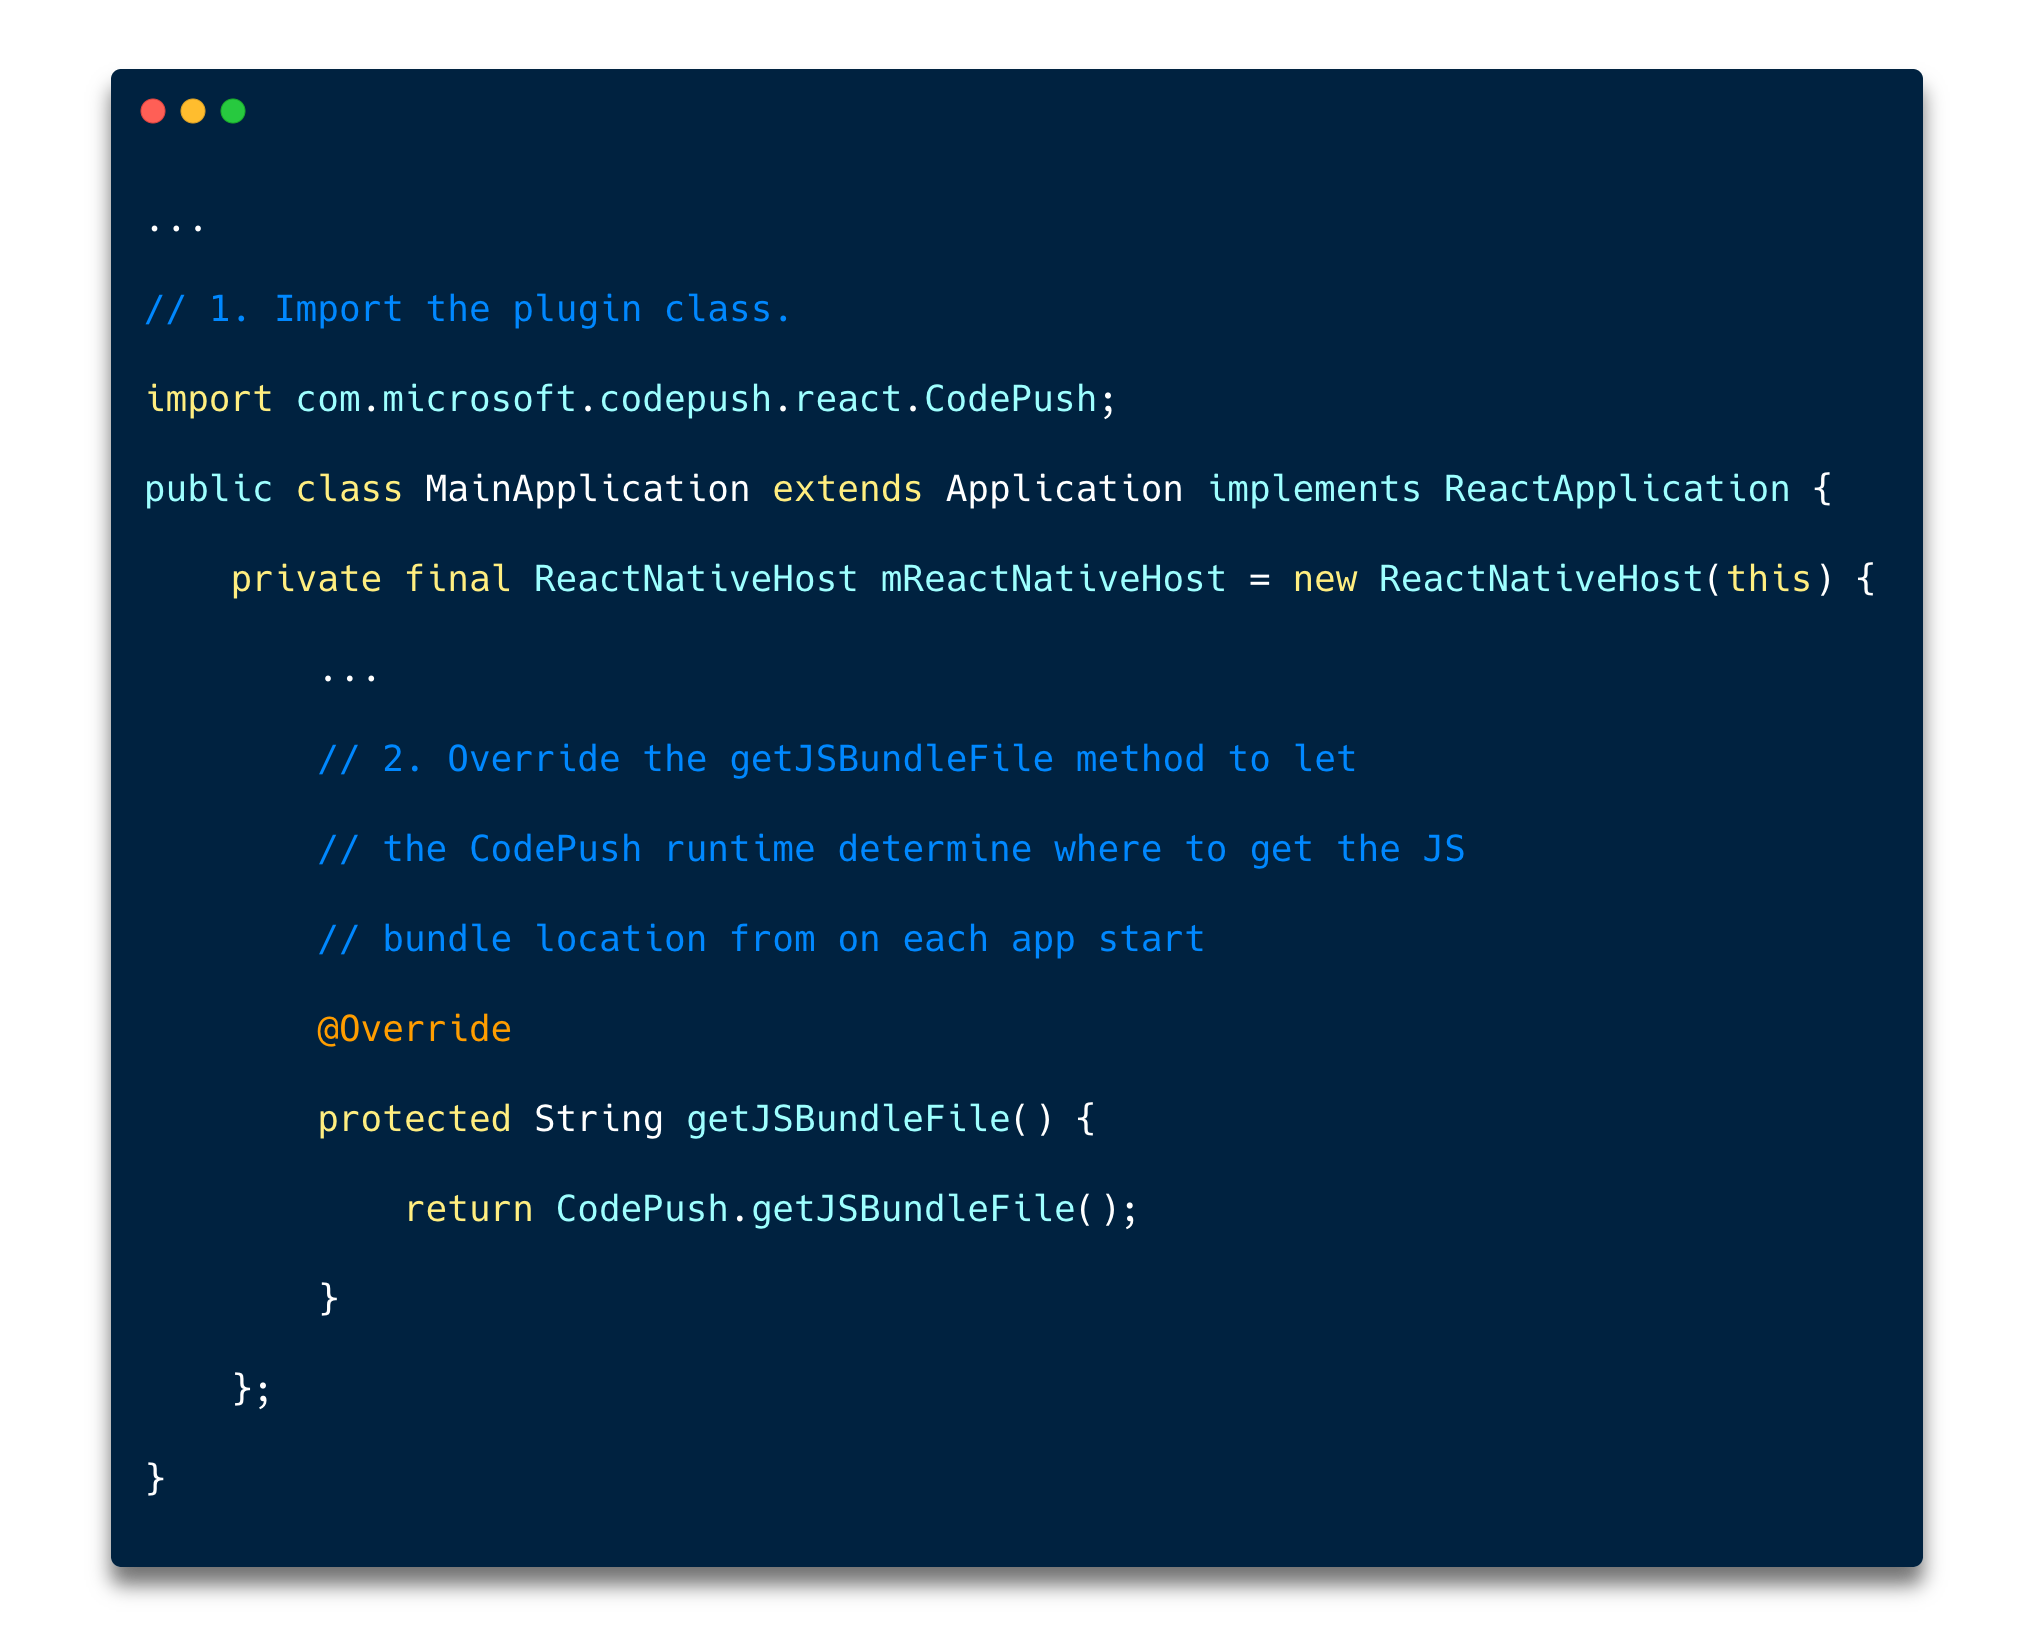
After that, inside the MainApplication.java file, make the following changes:
And finally, include the deployment key inside the strings.xml file:
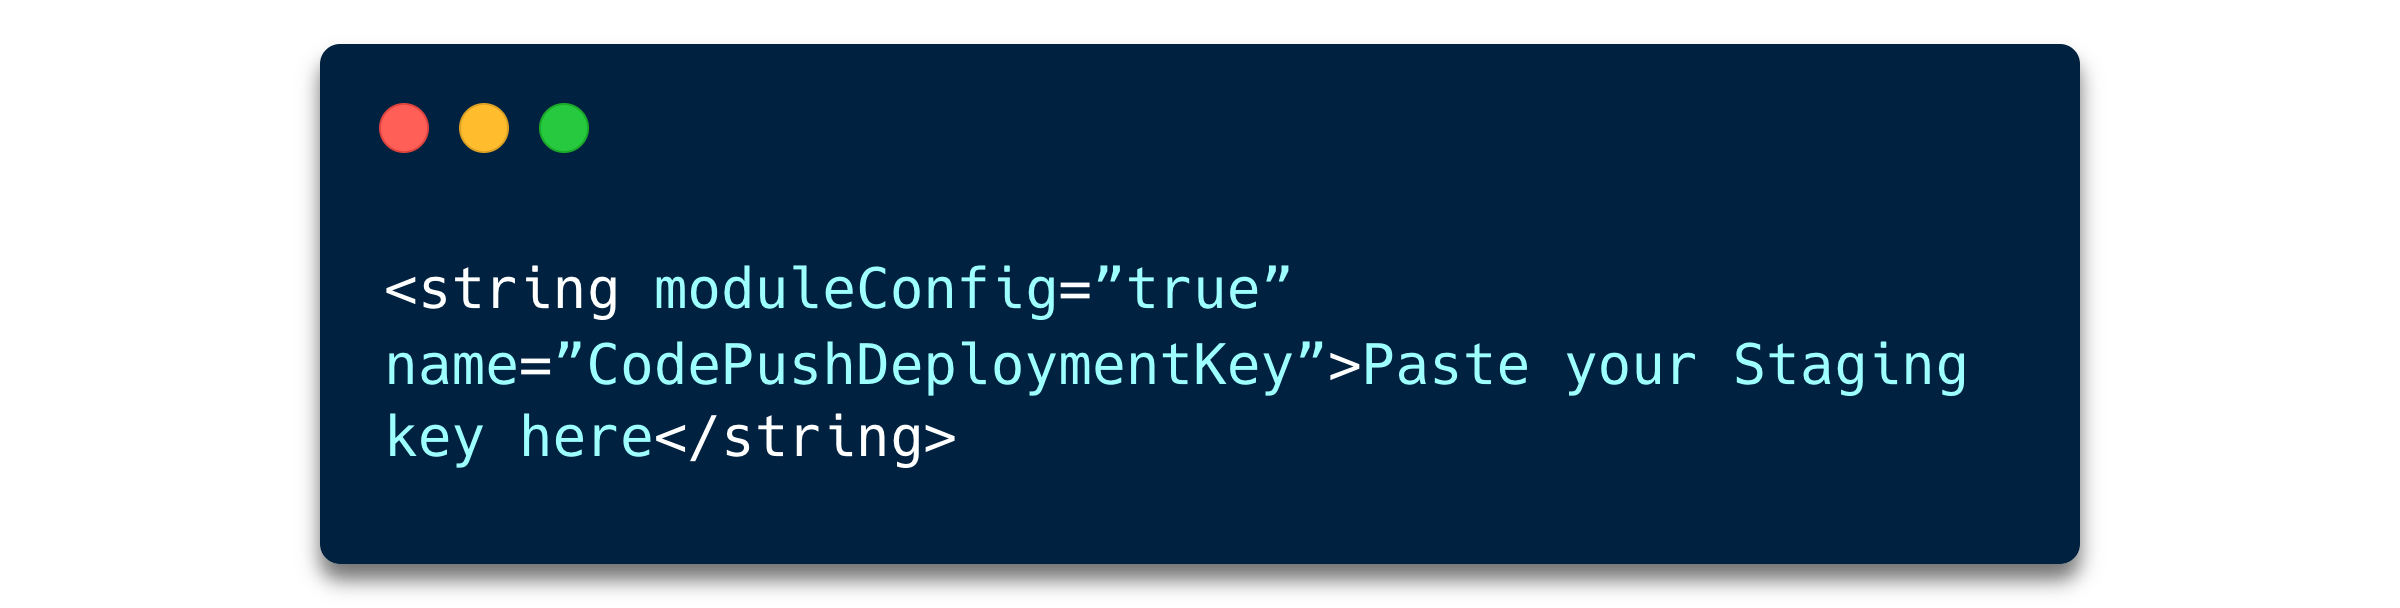
And with that last step, the configuration for Android is now ready!
We now need the detached standalone build for that, and you can follow the React Native documentation for Google Play Store distribution.
After that, let’s proceed the same way we did for iOS.
Once the application is running on an Android device, make a change and execute the following command on any terminal:
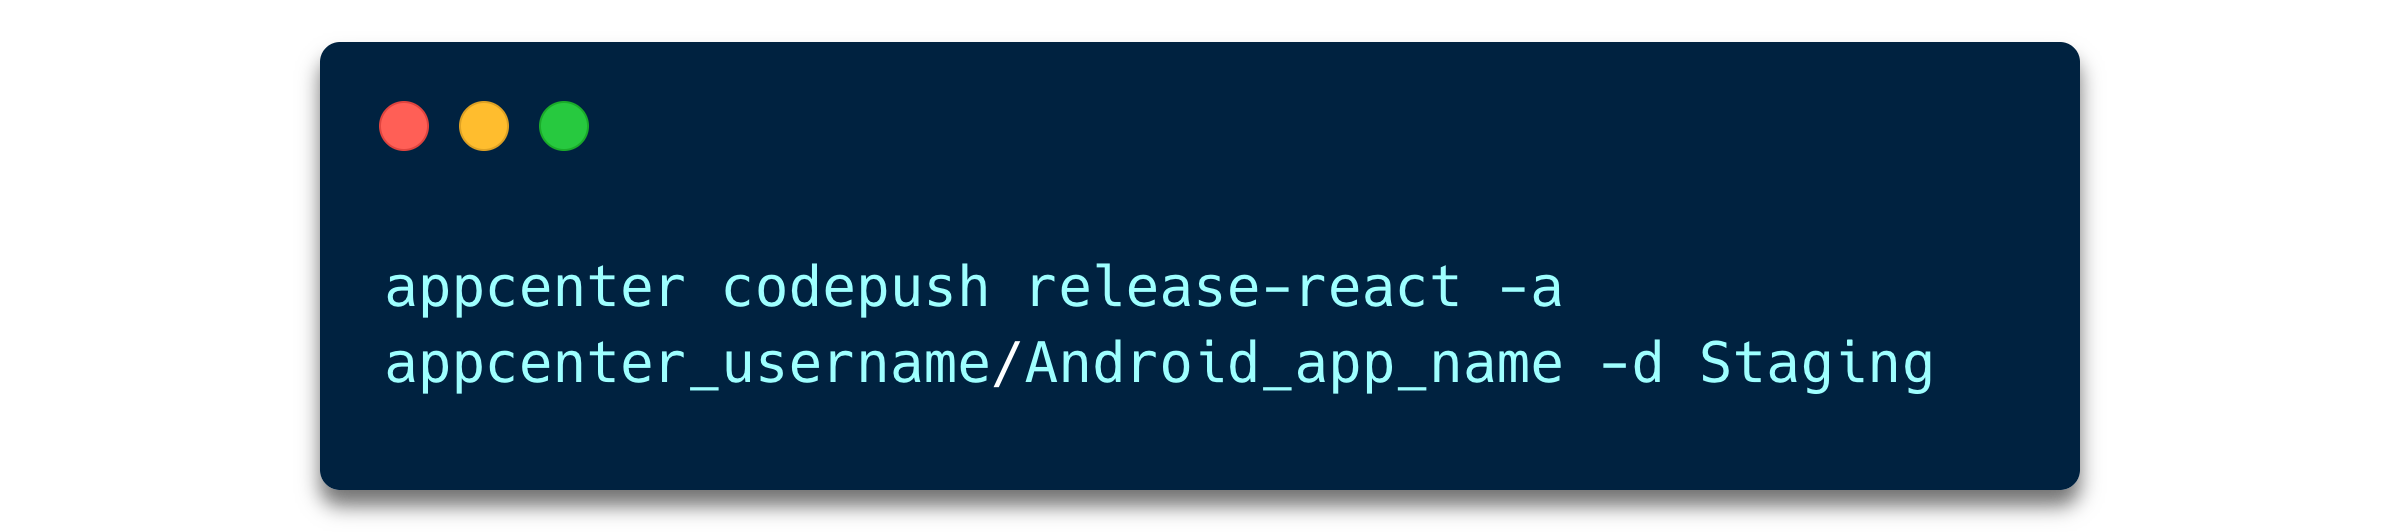
After the application is closed and restarted, you will be able to see the last changes deployed with CodePush to the app’s Staging environment.
Additional settings to update your React Native app with CodePush
By default, CodePush will silently update the app, applying the updates the next time the app restarts, so users won’t see any prompt informing about the changes or asking them to confirm the update.
However, this behavior and others can be modified to tweak the experience to your preference.
For example, we could change the checkFrequency value, which would define the moment CodePush fetches the updates (on app resume, on app restart, etc).
Or we could display a dialog to ask the user for permission before the update with the updateDialog option.
There are a lot of options available on the API reference, so definitely check it out and play around with different settings to see what suits you the best.
At Nuvolar, we can help you take full advantage of implementing React Native apps in your company.
Whatever your software needs, our dedicated team of talented professionals will provide you with the perfect product by using the latest tools and best practices the software industry has to offer. You and your users are at the center of our focus.
Contact us and let’s work together!
About Nuvolar:
We are a digital innovation consulting company dedicated to one unique purpose: helping businesses adopt world-class software solutions on the cloud so they can succeed!


Give me the latest news!
Welcome to Nuvolar’s blog. Subscribe to stay up to date with our latest news.

